If you have dreamed of going paperless and haven’t done anything towards that goal, then I know this can feel overwhelming and unobtainable. Continuing with last month’s theme of reducing clutter, I want to provide ideas for reducing paper clutter that may be overtaking parts of your home.
I will guide you through the following processes: transferring files from paper to digital and organizing these files in search friendly ways, saving receipts and recipes electronically and providing an idea for managing personal finance. Lastly, I will provide options for opting out of junk mail, and disposing of unwanted papers and sensitive documents.
Transferring Files from Paper to Digital
Step 1: Change Accounts to Paperless
To make this simple, start with one of your utility companies or one credit card. Moving onto bank accounts that might have multiple statements could be something to tackle once you get the hang of this process. I recommend selecting something that will give you satisfaction once you no longer receive paper bills going forward.
Once you’ve selected a company to begin the process, log into that company’s website and select “Paperless Billing.” There is usually an option to get an email or text notification when the statement/bill is ready to view. You might consider setting up autopay so writing and mailing checks become things of the past.
You may be someone who is perfectly happy just logging into your account online or through an app and seeing your transactions and balances. Therefore, you would not need a digital archive on your computer. Most banks and companies provide online access to the last 24 months of statements. There is usually a process for requesting older statements, if they are ever needed. If this suits your lifestyle, repeat opting into paperless billing for more companies. Then skip ahead to the next section “Ideas for Receipts.”
Step 2: Start Downloading Statements
My dad saved statements and receipts. We found utility bill statements from 1959 when he and my mom married. It was fun to see the prices of things so long ago, but thankfully I didn’t follow his footsteps for paper bills. That said, I do like to store digital copies of my statements on my computer. There have been a few times I needed proof of a purchase for a warranty repair, but mostly I like to have the historical data available anytime I might want to look at it. These next two steps explain how I download and organize my files so I can retrieve them anytime I want/need.
Since we are in the first month of a new year, while at the company’s website, find the statement for this month and select “download.” You might even want to download some statements from last year, to get the practice of naming and filing.
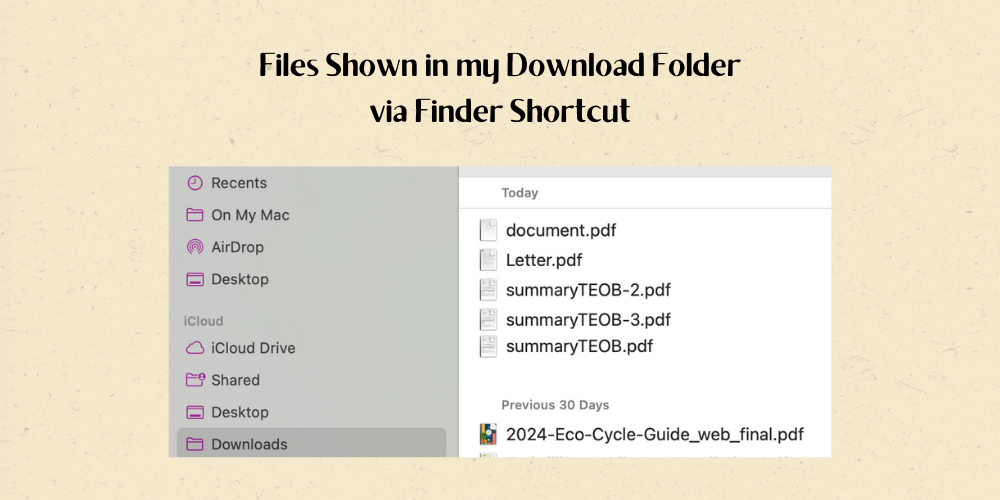
Once something is downloaded, locate the area of your computer where downloads are stored. Since I download many statements and other things from the internet, I have placed a shortcut in my “Finder Folder” for easy access to downloads. Every folder on my computer is set to sort alphabetically EXCEPT I have my downloads file set to sort by date created. This allows me easy access to recently added files. Once I download all the files needed, I open each one and rename it. At the same time I place it in its appropriate folder.
Step 3: Organize Files
Think about a filing cabinet that you have had or currently have. How do you organize the file folders? Do you have “Utilities” in one hanging folder with file folders for the different companies inside it? Do you alphabetize the folders? Do you arrange documents by date? By frequency of usage?
There are so many different ways to name and organize files and folders. Find something that works for you. If you aren’t sure, try one way and then adjust it for more clarity, if needed.
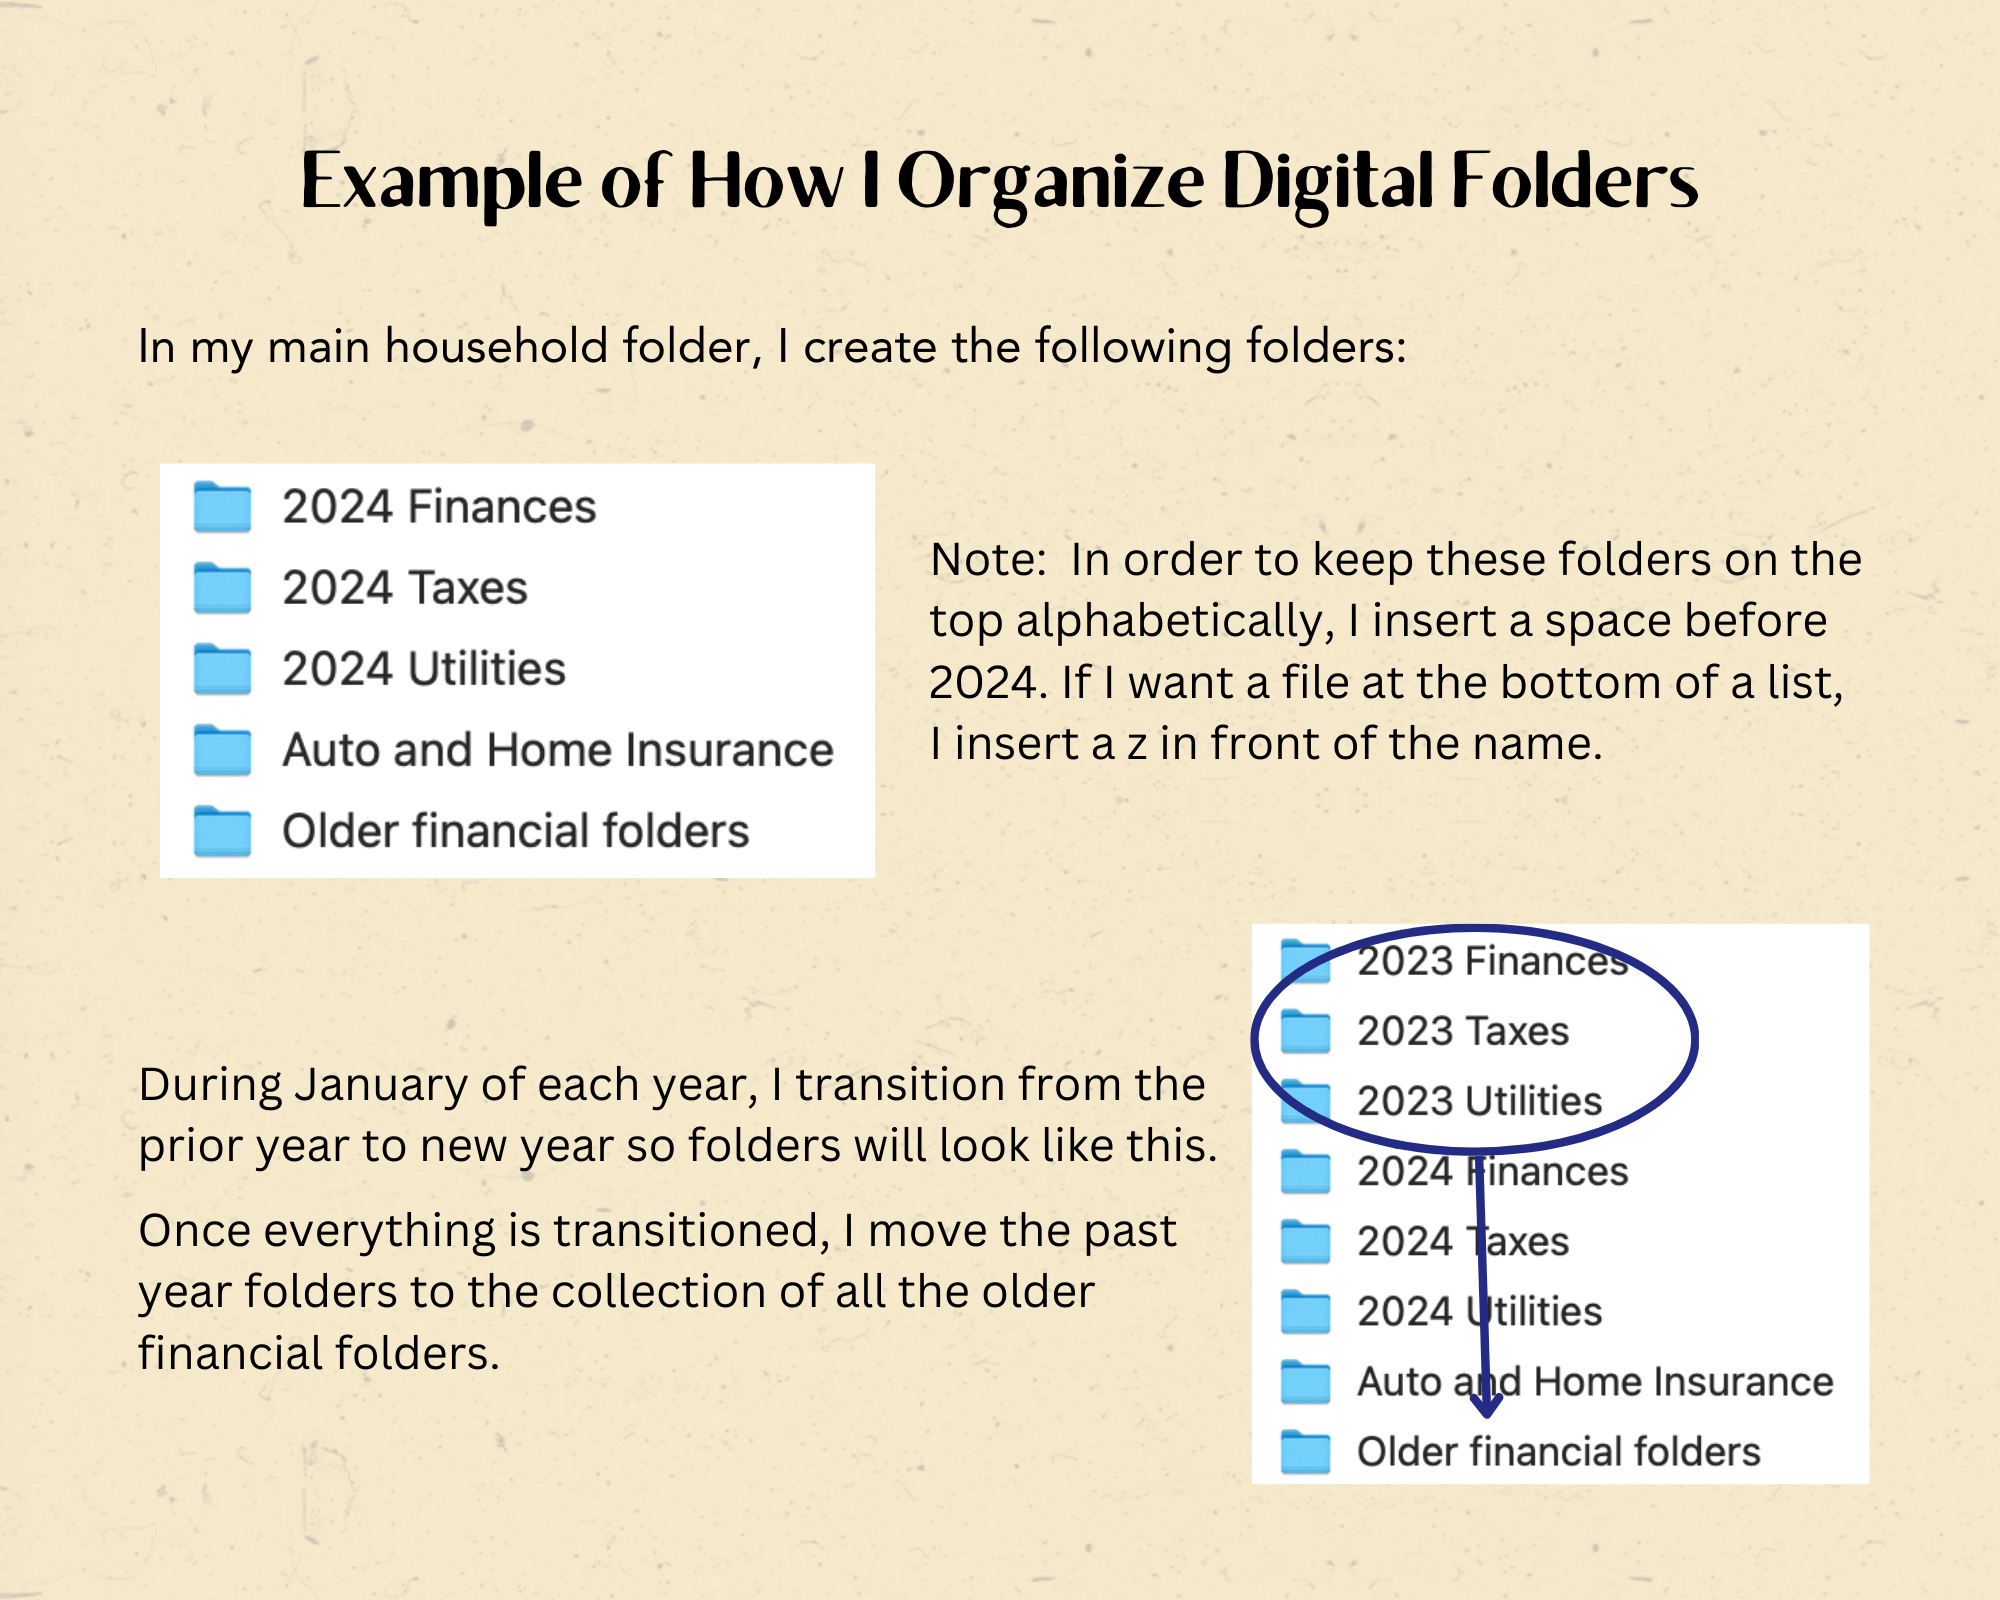
When I started getting serious about going paperless with bills and bank statements, I began using the following naming system that I still use today: YYYY MM company and description of file (if needed). My goal is to know what is in the file without having to open it (unless I want to see data in the file).
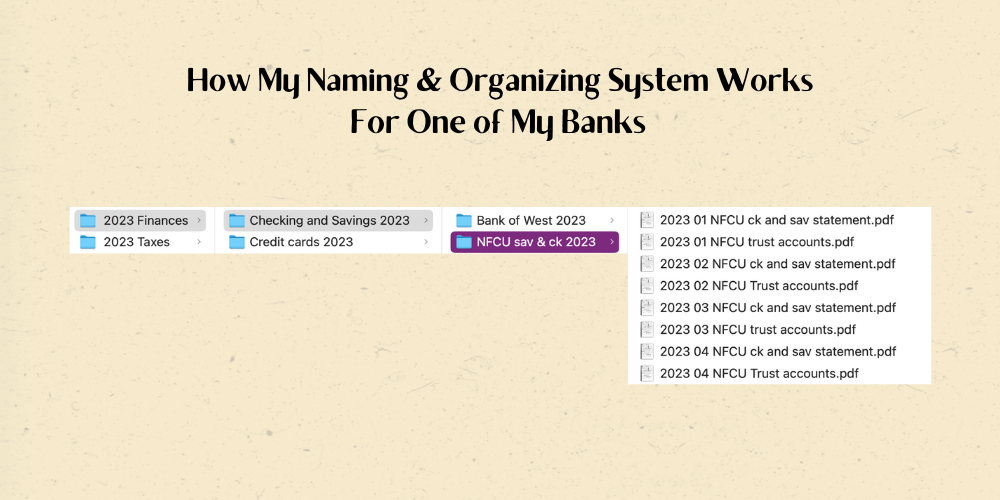
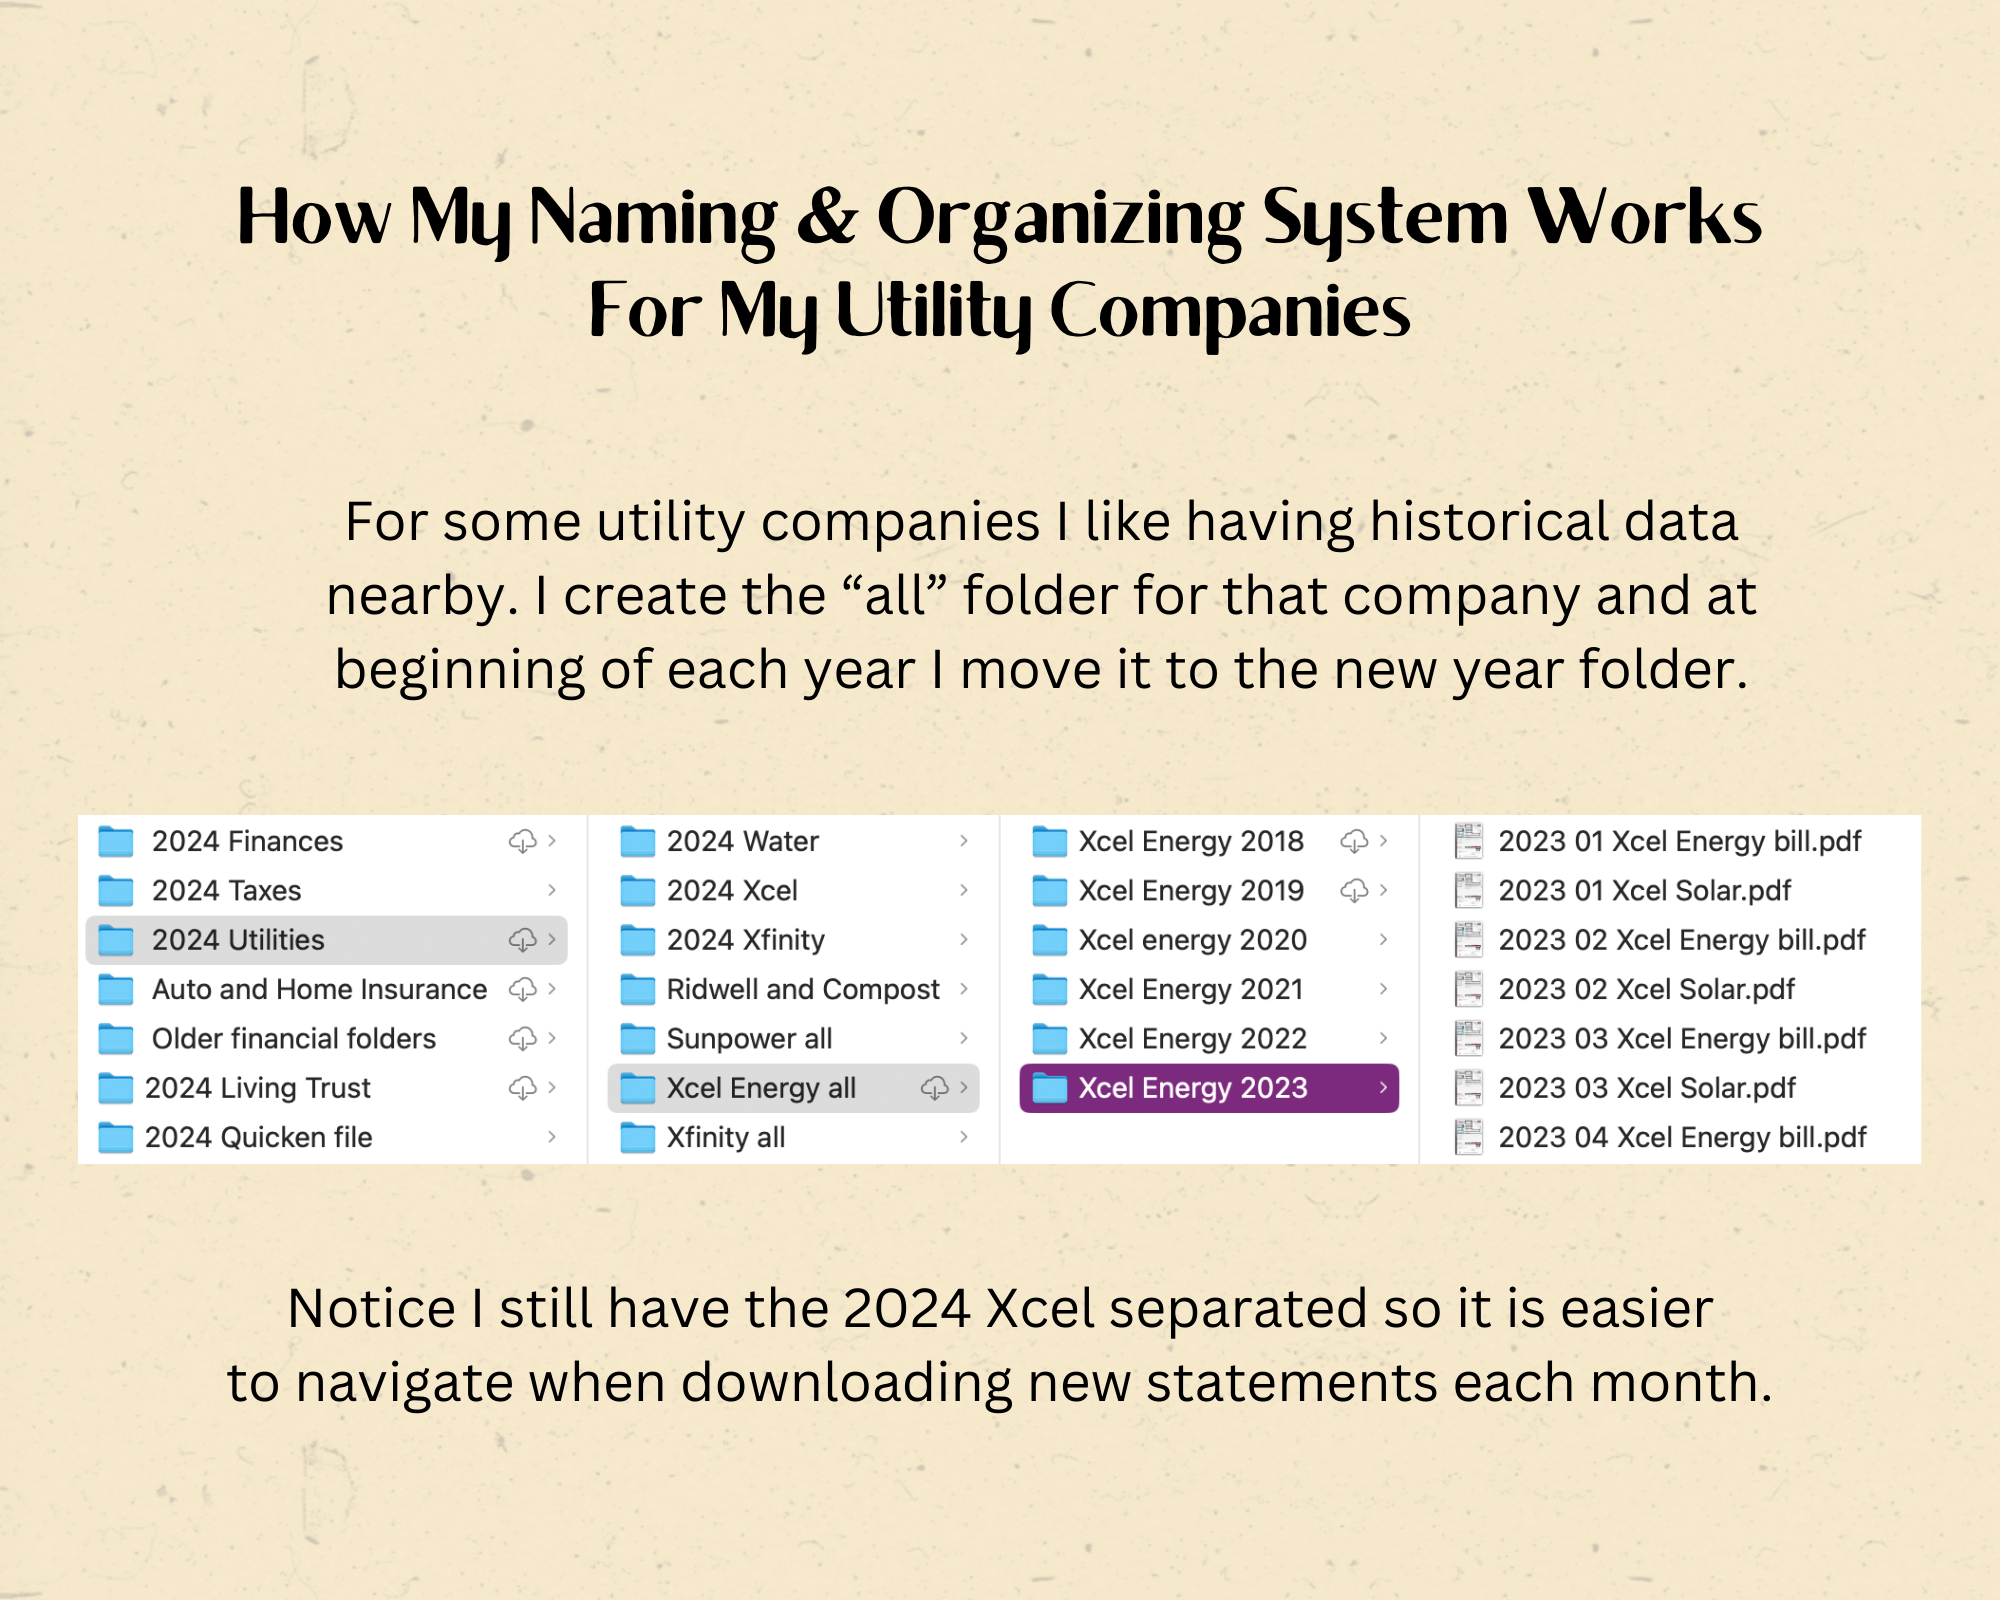
Once you’ve figured out a naming and organizing system to try, go back and download more statements. It isn’t hard once you set up the system.
Ideas for Receipts
As a Small Business Owner, keeping track of business receipts is important. There are many ways people do this and I’d love to read what works for you, if you have different methods. As I will mention in a later paragraph, I use a program called Quicken for my personal finance management. I have it installed on my smart phone and my computer. When I enter a business transaction into my Quicken register, I can attach a photo of the receipt. I can also attach a pdf version of the receipt, if one was given to me that way. When I am getting data and details ready for taxes, I run a Quicken report with all business transactions. The report includes any attachments. That way everything is in one location.
That said, I do have a Tax Folder on my computer for each year. I place my exported Quicken reports and all tax forms that are sent to me inside it. If I receive a paper version of a form (like a W2 or 1099) I either scan it to pdf or take a photo of it. I send everything to my Enrolled Agent electronically.
Evernote is another program that I love and have used for over a decade. In the next section of this blog I will write more about Evernote, but I want to mention that I do store many receipts inside this app. If I receive an emailed receipt for something important, business related or for a product with a warranty, I can forward that email directly into a new Evernote note. I can add “@receipt” to the email and Evernote will put the new note into my Receipts Notebook.
You may have figured out that I am a devoted Apple customer. Apple has a free application on all of their devices called Notes. It is easy to create a note and attach a photo of a receipt and then append any descriptions to it.
Apple devices and computers also have a Photos application included. Take a picture of a receipt, tag it with “receipt” and the year. You can then create a smart album that will include all photos with those tags.
The key to making something search-friendly is including tags or text with keywords.
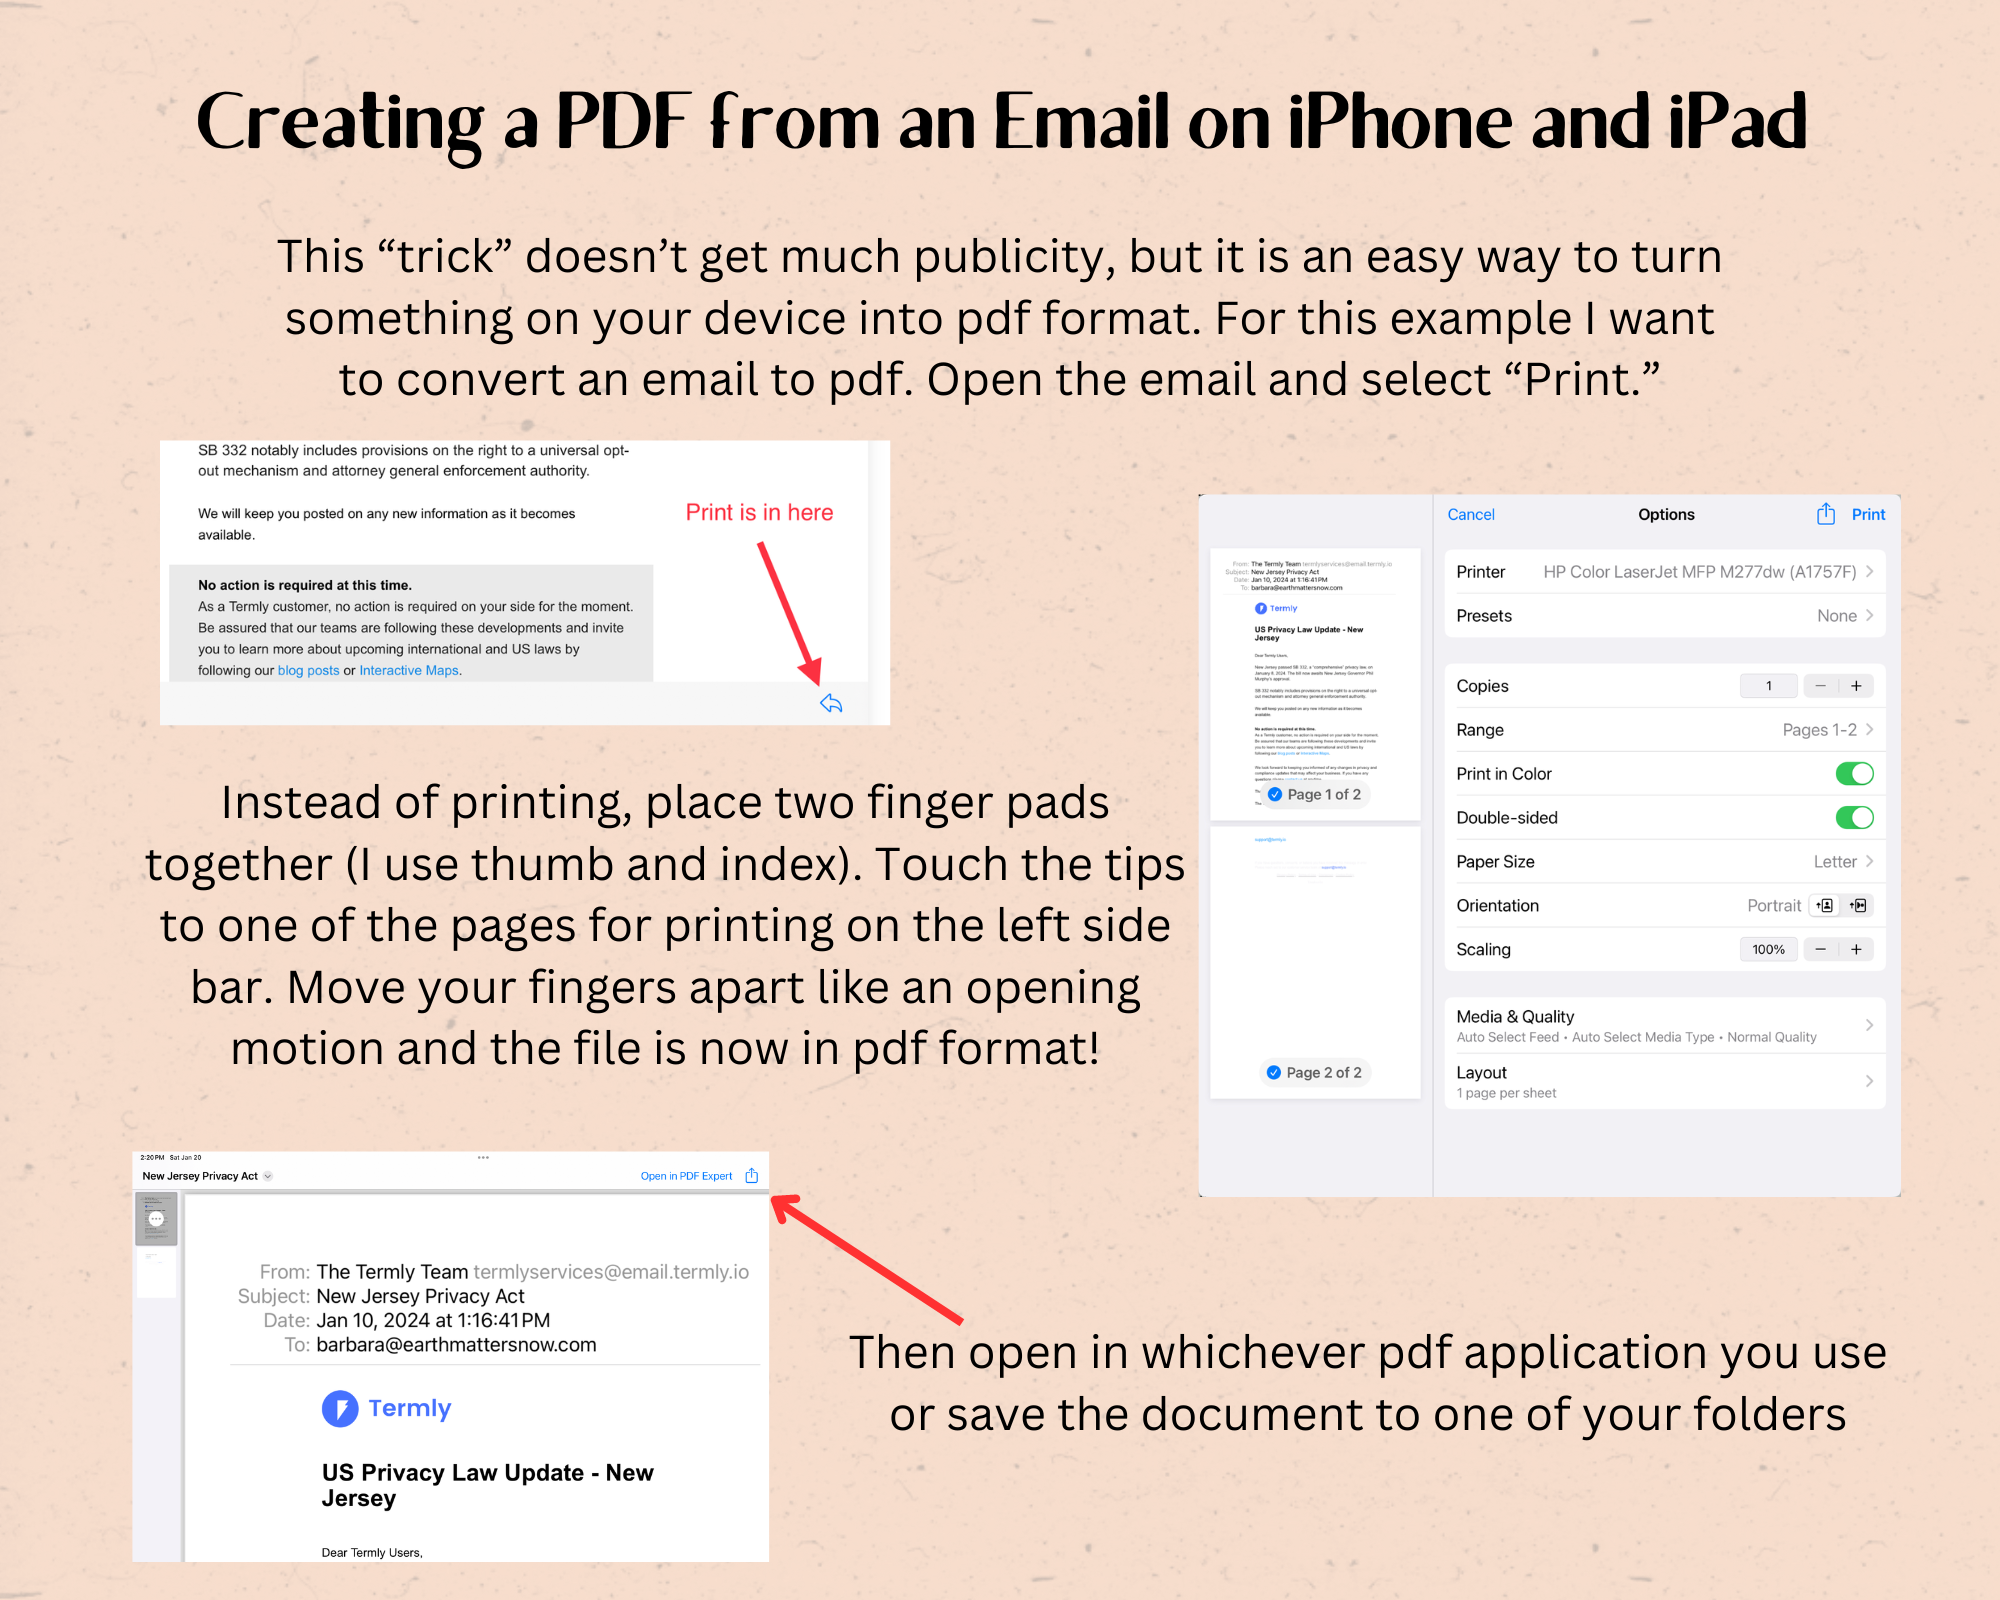
Sometimes I create pdf versions of receipts and tax forms by scanning the items through my printer (most printers sold today have a scanning capability, so this can be a simple step). I have it set up so the scanned files go to a thumbdrive. After transferring to my computer I open the file and name it. Once it is in pdf form, it can be filed in the appropriate folder based on your organizing system.
Ideas for User Manuals and Warranties
When you purchase new electronics, household furnishings, appliances, cars, etc. they usually come with printed User Guides and, hopefully, warranties. I used to have filing cabinet drawers filled with these items. Now I have one plastic crate with file folders. Even if I have a paper copy of these items, I try to find the PDF version online and put it in an Evernote note. With Evernote I can add a picture of the receipt, attach the user manual and type any notes about the product or purchase. Evernote has a powerful search engine, so if I need to find warranty information for my car, I just have to type the brand of my car into the search field and Evernote displays any notes that that contain that word. The search engine will also include occurences of the word(s) found in images!
If Evernote isn’t your thing, create a file using Microsoft Word, Apple’s Pages or Notes, or a pdf program like PDF Expert. These created files allow you to add images and documents. You can organize them in a folder called “User Manuals and Warranties,” for example.
Ideas for Recipes
Since I have been using Evernote since 2012, I use this program to store my recipes. I have a notebook called “Recipes to Keep” and “Recipes to Try.” Ultimately it doesn’t matter if the notes are in Notebooks, because when I am searching for a recipe, I type an ingredient into the search field and Evernote will display all documents and images that contain that word(s). As an example, I currently have a lot of broccoli in my refrigerator. I’ve already used some to make a stir-fry. When I entered “broccoli” into the search field, it showed me 59 notes that contain this word. Tomorrow do I make Mac and Cheese with Broccoli? Or maybe a Fresh Vegetable Soup?
As mentioned in the section about Receipts, photos of recipes can be put into a Note or Word/Pages/pdf document. The photos can also be tagged in the Photo app with “recipe.” The Photos app search engine also searches images for the words typed into it.
Ideas for Personal Financial Management
I admit, I have strong feelings about products and companies with quality products. Quicken is one of those companies. I have been using it since 1989 when I purchased my first Apple computer. It used to be a stand-alone program. Years later it moved to annual subscription as an option with more bells and whistles. When that happened, I looked for another personal finance program/app to use. I tried about 10 others over several months. None of them fit the bill for my needs and security. I went back to Quicken, but not the subscription. Today it is a subscription service and I have accepted the annual cost because of the sense of security it gives me when I download my bank transactions into Quicken each month.
Within Quicken (which I have on my computer and my smartphone) I can create an account for each of my actual accounts. There are options for checking, savings, investment, loans, and now even mileage tracking. Accounts are grouped by type so I can see how much I have in savings as individual accounts and as a total.
Quicken allows me to create a web link between my account on its platform and my online account at the financial institution. When I log into Quicken, I sync my banks and watch as my transactions get downloaded from bank to my Quicken account. Then I review each transaction and reconcile each account. In addition, I can upload attachments to any transaction. As mentioned in the section for receipts, I take a picture of paper receipts and attach them to the corresponding transaction for business expenses and purchases with warranties.
Several months ago I realized that I could attach each downloaded credit card statement to the transaction that pays off my credit card each month. These statements are also in a digital folder on my computer as mentioned in the beginning section of blog, but I also have quick and easy access through another means.
Each January I create several Quicken reports that show my spending in each category. At this time I will adjust my budget (created also in Quicken) to reflect actual spending or where I need to cut back. I export all of my reports and file them in my (YYYY) Tax folder.
Getting Rid of Junk Mail
Direct Marketing Association (DMAchoice.org) allows consumers to decide which types of marketing (if any) they want to receive. If you are getting product catalogs in the mail, DMA allows you to opt out of them. There is a $5 fee to register there, but it is only paid once. It is well worth the $5 in my opinion.
Disposing of Papers with Sensitive Data
Once you switch to paperless billing, you will have much less need for getting rid of papers with sensitive information. Until then, a shredder is the easiest way to get rid of it. However, getting rid of the shredded paper can sometimes be problematic. Some recycling companies will accept it if it’s in a tied off plastic bag. Other companies require it to be put into the garbage bin. When I lived in San Jose and had a large garden, I used shredded papers as mulch around some plants (wetting it down so pieces don’t blow away). I also have layered it with soil when I am preparing my garden for winter. Another option is to check with your local Humane Society. Some accept shredded paper for animal bedding.
This is what I do today. I’ve realized that many parts of a document are fine for recycling, just the top part has my information. So I tear off the parts with important data, tear them into smaller pieces and then add them to my compost bin. The larger pieces of paper are then put into my recycling bin. Since most things are paperless, I don’t even have a shredder anymore.
Closing Thoughts
Applications such as Evernote, Quicken and PDF Expert, Photos and Notes have allowed me to create a workflow for paperless living in so many areas of my life. Evernote has a free version for customers as well as different levels of subscriptions. It is running a 50% off special until January 23rd. I am happy to teach you how to use any of these, if you feel inclined to try them out.
As I look at my desk and workspace right now, I realize that I have gotten lazy. I currently have a mess created by not filing things or disposing of things promptly. I usually will take one morning each month to balance my accounts on Quicken, pay bills that can’t be set up on autopay, download statements, and file or dispose of papers. Recovering from rotator cuff surgery (dominant arm, no less) has put me behind. So once this blog is published, that is my first order of business — file and dispose of papers that are cluttering my office, desk, space and mind.
If it going paperless isn’t working out and/or still feels overwhelming, please reach out to me and let me guide you through the process. Remember that I am a retired teacher and patiently helping others try new things is one of my super powers.
Won’t you join me in creating clean and serene spaces? Share your methods and thoughts below! I can’t wait to read what works for you.
Thanks Barbara! You have given me so many great ideas . I have been procrastinating not really knowing where to start . I now feel ready for this journey of going paperless.
I’m so happy this was helpful Angelica! Please reach out if I can help or coach you through this process.
So any good ideas on reducing paper use. And I like the idea of putting recipes into Evernote and being able to search for one using a particular ingredient. Thank you!
I’m happy to see that I do at least a few of these. But I need to set aside more time to create a better system of collecting records for tax time.